
Que' onda? 무슨 일이야? 분위기 어때요? 별일 없지?
onda = 파도, 물결
사람+ onda = 분위기, 성격
Ella es buena onda 그녀는 좋은 성격의 사람이야
gracias que' buena onda 감사해요, ,정말 좋은 사람이네요
Que' paso'? 무슨 일이야, 무슨일이 일어났어?
Nada especial 특별한일 없어.
Que' onda? 무슨 일이야? 분위기 어때요? 별일 없지?
onda = 파도, 물결
사람+ onda = 분위기, 성격
Ella es buena onda 그녀는 좋은 성격의 사람이야
gracias que' buena onda 감사해요, ,정말 좋은 사람이네요
Que' paso'? 무슨 일이야, 무슨일이 일어났어?
Nada especial 특별한일 없어.
강세의 차이
1. 지시 대명사 (화자의 위치에 따라 달라짐) 이것, 그것, 저것 중성: 앞 문장 전체를 가르킬때, 무엇인지 정확히 모를때
eso es lo que te digo. 그게 바로 내가 너에게 말하는 거야.
Que' es esto?
| 이 | 그 | 저 | |||||||
| 남성 | 여성 | 중성 | 남성 | 여성 | 중성 | 남성 | 여성 | 중성 | |
| 단수 | e'ste | e'sta | esto | e'se | e'sa | eso | aque'l | aque'lla | aquello |
| 복수 | estos | e'stas | estos | e'sos | e'sas | esos | aque'llos | aque'llas | aque'llos |
2. 지시형용사 + 명사 스페인어 명사는 중성이 없다. 이에 아래는 중성이 없다
| 이 | 그 | 저 | ||||
| 남성 | 여성 | 남성 | 여성 | 남성 | 여성 | |
| 단수 | este | esta | ese | esa | aquel | aquella |
| 복수 | estos | estas | esos | esas | aquellos | aquellas |
este libro (이 책)
esta (지.형) e'sta(지.대) esta'(estar)
| 어떤 | 남성 | ㅇㅕ성 |
| 단수 | alguno(algu'n) | alguna |
| 복수 | alguna | algunas |
| 아무것도 없는 | 남성 | 여성 |
| 단수 | ninguno(ningu'n) | ninguna |
| 복수 | ningunos | ningunas |
no hay ningu'n espano en mi clase
ninguno de elloas quiere comer pizza
* 추가
nada = nothing
no tengo nada
no se' nada de france's
nadie = no one
no hay nadie en la calle.
의문사
| que' | 무엇 | quie'n 누가 |
| cua'ndo 언제 | do'nde 어디서 | co'mo 어떻게 |
| por que' 왜 | cua'nto 얼마나 많ㅇㅣ |
간접 의문문
no se' cua'ndo es tu cumpleanos.
| 그냥그냥 (1) | 2025.01.02 |
|---|---|
| 지시사 (0) | 2025.01.02 |
| 단어 (0) | 2024.03.03 |
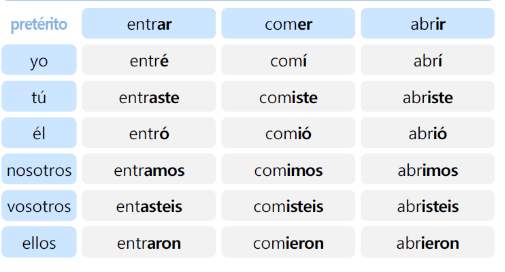
| 스페인어 과거 시제 (0) | 2024.01.20 |
| algo alguno (0) | 2023.11.28 |
12/3 드디어 그 미친놈이 세상에서 자기가 미친놈들 중 넘버 1이라고 선언을 해버렸다
물론 내가 태어나서 겨우 걸음마를 할때 계엄이 있었으니, 실제로 경험한건 이번이 처음이지.
다들 거짓말이라고 생각했지만, 뉴스속보를 보는 순간, 저... 저거 술마신거 아니야? 이런 말이 절로 ...나온다
나만 그런 생각을 했던게 아니였다는걸 알기까진 얼마 걸리지 않았지만...후훗
여당들이 똘똘뭉쳐 탄핵안 표결에 참석하지 않는걸 보면서,, 양의 탈을 쓰고 양무리에 숨어 있는 늑대들같다는 생각이
든다. 아직도 나라가 시끌시끌하다. 당연하지, 지금도 피가 거꾸로 흐리는거 같은데...
대선 초 건희 아줌마가 미리 국민을 위해 진실을 밝혔지만, 우린 정말 이정도까지 미친 놈인줄은 감히 상상도 못했다
"우리 오빠는요~ 아무것도 못해요~ 바보예요, 바보"
건희 아줌마 ,,,믿어 주지 못해 미안해..
2024년도 이제 얼마 남지 않았다. 그래도 다른 년도보단 나름 뜻깊게 노력한 한해였지만, 결과는 만족스럽지 않다.
오늘 팀장 발표(회사인사발표)가 있었다, 다른 동료들고 그러하겠지만, 나 역시 간절히 기도했다,
제발 우리팀장 짤리게 해주소서...제발제발...
늘 그렇듯.. 세상은 내가 간절히 바라는건 절대 들어준 적이 없었다는걸 잠시 망각하고 살았다.
내년엔 한살 더 먹는데..체력도 올해보다 안 좋을텐데.. 어떻게 버티지...!!
인사평가 다 끝났는데, 일이 미친듯이 많다. 그리고 다들 남의 일인듯 신경쓰지 않는다. 그래 신경쓰지 않아도 좋아.
하지만 너희들이 해 줘야 할 일들은 제발 제대로 해줘.. 몇번을 다시 하고 다시 하고.. 넘 힘들다.
메신저로 우연히 홍콩 친구를 사귀었다. 사귀었다라는 표현이 좀 이상하기도 하다. 이제 일주일되었으니.
상상하는 그런 사이 아님. 결혼한거 당당히 난 밝혔다. 와이프한테도 이야기했고,
물론 저기 12/3 미친놈 보다는 덜하지만, 그 비슷한 느낌으로 날 쳐다보긴 했지만,
이 친구 갑자기 그러는거 아닐까 의심스럽기도 한데....!!
".. 무슨무슨 이유로 돈이 필요한데~~~"
뭐 그땐 그냥 "차단" 하면 되니깐... 난 쿨하니깐,,, 늘 혼자에 익숙하니깐,,,, 음.. 난 외롭지 않으....니깐..
| 2024-05 삶이 지칠 때 (1) | 2024.05.07 |
|---|---|
| 힘들 때 함 읽어보자 (0) | 2023.12.17 |
| 배우는 사람 (0) | 2023.05.10 |
| 힘들때 읽자! 듣자! (0) | 2023.04.03 |
| 금주 (0) | 2021.07.17 |
나이가 들면 인생이 더 나아질줄 알았는데.. 하나의 산을 넘으니 더 큰 산이 내 앞을 가로 막고 있다.
버티고 버티면 더 나은 최소한 오늘의 나 보단 나은 삶이 기다릴줄 알았지만,,
삶이란 녀석에겐 자비가 없는거 같다.
바둥바둥 하루를 보내고 또 다시 다가올 내일의 반복을 걱정하는 삶이 전혀 익숙해지지 않는다.
뭐.. 다른 사람들도 그러하리라.. 즐겁던 힘겨웠던,, 나름의이 휴일을 보내고 맞이하는 출근길 아침을 그들도
내심 힘들어 할것이다. 그렇게 힘들게 도착한 사무실에서 애써 웃을을 짓고 " 좋은 아침!" 이라 맘에도 없는 인사를 건내며,서로에게 거내며, 타인들의 삶은 행복했을거라,, 그러니 이렇게 밝게 웃으며 인사를 건내리라 생각하고 생각하며,
내 스스에게 다시금 상처를 주는 말을 되풀이한다." 왜 나만...이렇게 힘들까?"
경주마처럼 앞만 보고 열심히 살아오진 않았지만,, 내 나름 어느 정도는 열심히 달려왔다고 생각한다. 이젠 노쇠처럼 맘도 몸도 지쳐, 앞으로 달려가야할 저 길고 긴 트랙을 보면서, 용기보단 겁이 먼저 나는것도 사실이다.
이젠 조금은 일도 시간도 여유로웠으면 하는데.. 이놈의 회사는 위기가 아닌적이 없고, 일은 사채이자만큼 갚아도 갚아도
늘어나기만 한다.
이게 과연 온전한 삶이 맞을까? 이렇게 달려온것처럼 달려간다면 , 그 끝엔 무엇이 있을까? 과연 내가 그 끝까지 달려갈수 있을까?
어디서 부터 잘못된걸까?
이제부턴 생각이 날때마다 하나씩 나의 작은 투정들을 글로 적어볼까 한다.
가끔? 우연히? 10년전쯤 그러니깐 30대후반쯤에 적은 글들을 볼때가 있다. 그때의 나는 지금의 나보다 생각도 깊고, 좀더 많은 희망과 삶의 색깔을 가지고 있었던거 같다. 그래 그랬었던거 같다. 그래... 그랬었지..
얼마전에 '한단지몽' 이라는 사자성어를 유투브에서 이야기식으로 봤는데.. 위안이 말이 되더라.. 그래.. 꿈이였으면,,
이 모든게 꿈이였으면,,, 아니야 정말 꿈일꺼야?
이 꿈을 깨고 나면 보다 나은 세상의 내가 있을까? 아니면 그곳의 나역시 또 다른 꿈일까 ?
비오는 이른 아침 이런 내 모습이 아마도 조용히 미쳐가는 첫 걸음이 아닌가 싶기도 하다
오늘 아침 뉴스 " 20대 여성 살해 용의자 수능만점, 의대 재학생"," 길다건 50대 여성,차에 치여 사망, 급발진 주장"
어제의 해프닝!! 다니는 고객사(해당 고객사 내 여러 작은 회사들이 일을 돕고 있다) 축제, 유명가수(아이돌 포함) 초대 , 자기내 회사 구성웡만 참석 가능
요즘은 SNS나 핸드폰을 잘 하지 않는다. 아침 뉴스도 날씨정도만 보는 정도..
세상살이 걱정도 많고 관심도 많은게 사실이지만, 돈으로 만들어진 그 작은 세상속엔 늘 지옥의 삶을 알리는 뉴스와, 광고, 그리고 그 삶을 포장한 거짓들이 넘쳐나고 , 거기에 중독된 사람들이 서로 경쟁하듯 또 다른 지옥을 만들어 내는것 같다.
아름답게 美친 세상이였음 하는데, 비단 내가 사는 이곳만의 문제는 아닐테지..
경쟁이 만든어낸 결과다, 이렇다 저렇다 몇일동안 시끄러울테지... 그리고 또 다시 아무일 없는 듯 일상이 반복되겠지.
그냥 단지 다들 행복하길 바랄뿐인데.. 그게 참 힘들다.
최근들어 술이 잦다. 좋아서 한잔 두잔...그랬으면 좋겠지만... 그냥 우울한 마음이 조급함에 먼저 한잔의 건배를 외치는걸 참지 못하는거 같다.
뭐.. 어때 ... 지금껏 내 나름 열심히 살아왔잖아.. 두번, 세번 사는 인생 없고,, 누구나 실수 하고 ... 다들 그렇게 살잖아.
남들이 뭐라해도..난 나름 열심히 살아왔고, 지금고 열심히 살고 있는데...왜 맘이 이렇게 아프고 힘든걸까?
수백수천번의 위로를 해도 채워지지 않는 마음은 또 스스로에게 상처를 입힌다.
내가 미친건지 세상이 미친건지.. 모르겠지만... 난 살고 싶고 행복하고 싶다. 행복해지고 싶다.. 하루하루
미안!! 오늘은 얼큰히 취한 상태에서 이렇게 저렇게 맘을 적어 보는 중이라...
우리는 정말 행복해질수 없는건가.... 행복이란 뭘까.
네이버를 찾아본다
역시 믿을게 안된다.
행복이란... 행복이란... 그냥..음..그냥..우울함반 무탈함 반... 뭐 이런게 아닐까?
너무 뭐.. 막.. 이상하게 정의하는것 보단...
오늘의 무탈함에 감사하고, 이 모진 인생에 그래도 오늘 하루 나름 잘 견디어냈다고 스스로를 토탁거리는 것..
5월 중순인데도 강원도에 폭설이 내렸다는 뉴스를 보면서.. 나 하나 미친건 문제가 아니구나..이렇게 깨닫는것.
그리고..힘들고 슬픈 나를 오늘 위로해줄수 있다는것..
하루하루 살아갈수록 신이란 존재에게 삿대질 할 용기? 악만 쌓여간다는것..
그래도 밤새 내린 비가 그친 아침 파란 하늘을 보며, 벌써 가을이구나..라며 5월 중순에 정신줄을 기분좋게 놓아버리는것
뭐.. 행복 별거 아니구만..그래 별거 아닌거야...나만 괜찮다면,,,
그래..나만 괜찮다면...
| 2024-12 그래도 가끔은 웃긴 인생 (1) | 2024.12.12 |
|---|---|
| 힘들 때 함 읽어보자 (0) | 2023.12.17 |
| 배우는 사람 (0) | 2023.05.10 |
| 힘들때 읽자! 듣자! (0) | 2023.04.03 |
| 금주 (0) | 2021.07.17 |
스페인어 'sonreir' 동사는 영어로 표현하자면 'to smile' 동사입니다.
인칭대명사를 사용하여 간략하고 쉽게 배워보겠습니다 ^^ 현재 - presente
yo sonrío
tú sonríes
él sonríe
nosotros sonreímos
vosotros sonreís 스페인어 'llorar' 동사는 영어로 표현하자면 'to cry' 동사입니다.
인칭대명사를 사용하여 간략하고 쉽게 배워보겠습니다 ^^ 현재 - presente
yo lloro
tú lloras
él llora
nosotros lloramos
vosotros lloráis
ellos lloran 스페인어 'quedar' 동사는 영어로 표현하자면 'to stay' 동사입니다.
인칭대명사를 사용하여 간략하고 쉽게 배워보겠습니다 ^^ 현재 - presente
yo quedo
tú quedas
él queda
nosotros quedamos
vosotros quedáis
ellos quedan empacar 포장하다 스페인어 'andar' 동사는 영어로 표현하자면 'to stroll' 동사입니다.
인칭대명사를 사용하여 간략하고 쉽게 배워보겠습니다 ^^ 현재 - presente
yo ando
tú andas
él anda
nosotros andamos
vosotros andáis
ellos andan
동사 poder 의
<단순과거> :영어에 비교했을 때, simple past 의 시제와 비슷한 시제
변형이
pude / pudiste / pudo / pudimos / pudisteis / pudieron 입니다.
사실은 1인칭 단수 과거형은 pude 가 맞습니다^^;; pudo는 3인칭 단수 형이되구요~
그 의미는 '할 수 있었다' 에 해당이 됩니다. 이어서,
<가능법> : 영어에 비교해서, conditional 조건문의 표현에 해당,
변형으로의 동사 poder 의 변형이 바로
podría / podrías / podría / podríamos / podríais / podrían 입니다.
정중한 표현으로 '할 수 있다' 의 표현일 때 사용합니다. 영어의 경우, could 의 변형으로 동사 can 의 과거 변형 및 조건 변형을 함께 쓰기 때문에 번역기에서 I could 로 발견되시는 것 같습니다. 또한 poder 의 미래시제 변형은
podré / podrás / podrá / podremos / podréis / podrán 의 변형입니다. 스페인어 'devolver' 동사는 영어로 표현하자면 'to give back' 동사입니다.
인칭대명사를 사용하여 간략하고 쉽게 배워보겠습니다 ^^ 현재 - presente
yo devuelvo
tú devuelves
él devuelve
nosotros devolvemos
vosotros devolvéis
ellos devuelven hacia -를 향해서
스페인어 'reir' 동사는 영어로 표현하자면 'to laugh' 동사입니다.
인칭대명사를 사용하여 간략하고 쉽게 배워보겠습니다 ^^ 현재 - presente
yo río
tú ríes
él ríe
nosotros reímos
vosotros reís
ellos ríen
스페인어 'enojar' 동사는 영어로 표현하자면 'to anger' 동사입니다.
예를들어,"나는 길을가다 똥을 밟아서 화가 났습니다."를 스페인어로 하면
"Yo me enojé, cuando he pisado la caca en la calle" 입니다.
인칭대명사를 사용하여 간략하고 쉽게 배워보겠습니다 ^^

| 지시사 (0) | 2025.01.02 |
|---|---|
| 부정 대명사 (0) | 2025.01.01 |
| 스페인어 과거 시제 (0) | 2024.01.20 |
| algo alguno (0) | 2023.11.28 |
| 실비아샘 스페인어 (0) | 2023.11.26 |
--[과거 완료]---------[완료 과거]---------[현재완료]------------
--[ 불완료 과거 ]
현재분사( - ando, iendo)
[완료과거]
시제는 과거에 끝난 사건을 나타낸다 [최근과거]
[불완료과거]
과거에 진행되고 있거나 반복된 사건을 나타낸다


[과거완료]
과거에 일어난 두개의 이야기를 하는 경우 그중 시간적으로 앞선 일을 나타내며,
haber 동사의 불완료 과거시제 habi'a, habi'as, habi'a, habi'amos, habi'ais, habi'an 와 과거 분사 ( - ado,-ido) 가 결합된 형태이다.

내가 오늘 아침 공항에 도착했을대 비행기는 이미 떠났었다.
Cuando he llegado al areopuerto esta manana, el avion , ya habi'a salido

현재완료: haber + p.p


현재분사: 동사원형 + ing
~ 하는, ~하고 있는
과거분사: 동사원형 + ed(규칙),p.p( 불규칙)
의미: ~ 당한, ~된
broken mirror

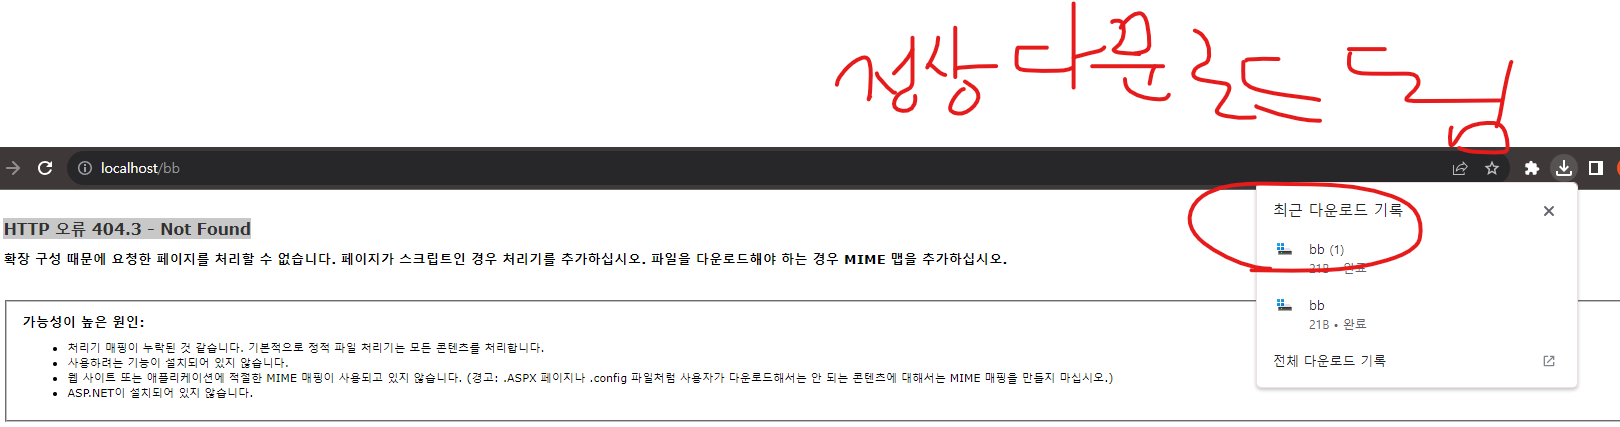
from notebook.auth import passwd
해당 모듈 import 시 설치가 되어 있지 않다고 나올 경우
(base) root@jupyterlab-deployment-96d5cd489-kjrd4:~# jupyter notebook --generate-config
Writing default config to: /home/jovyan/.jupyter/jupyter_notebook_config.py
!pip3 install notebook==6.5.5
이렇게 해서 해결이 안되면
!pip3 install --upgrade ipython
요렇게 도 해본다
다시
from notebook.auth import passwd

# 아래 전체가 암호이다
'argon2:$argon2id$v=19$m=10240,t=10,p=8$QbPT9aYvhdqRFecguJX5sg$ArunzaJ65DCEA6MnCL7N9Y2m0Y1XwVCR3N95PC3lGxE'
(base) root@jupyterlab-deployment-96d5cd489-kjrd4:~/.jupyter# vi jupyter_notebook_config.py
없으면 추가
c.ServerApp.password_required = True
c.PasswordIdentityProvider.hashed_password = 'argon2:$argon2id$v=19$m=10240,t=10,p=8$QbPT9aYvhdqRFecguJX5sg$ArunzaJ65DCEA6MnCL7N9Y2m0Y1XwVCR3N95PC3lGxE'
deply.yaml 에서
chmod -R 777 /home/jovyan/work
start.sh jupyter lab --LabApp.token='password' --LabApp.ip='0.0.0.0' --LabApp.allow_root=True
해당 부분을
start.sh jupyter lab --LabApp.token='' --LabApp.password=''
이렇게 변경
해당 부분을
apiVersion: apps/v1
kind: Deployment
metadata:
name: jupyterlab-deployment
namespace: default
spec:
replicas: 1
selector:
matchLabels:
app: jupyterlab
template:
metadata:
labels:
app: jupyterlab
spec:
securityContext:
runAsUser: 0
fsGroup: 0
containers:
- name: jupyterlab
image: jupyter/datascience-notebook:latest
imagePullPolicy: IfNotPresent
ports:
- containerPort: 8888
command:
- /bin/bash
- -c
- |
chmod -R 777 /home/jovyan/work
start.sh jupyter lab --LabApp.token='' --LabApp.password='' --LabApp.ip='0.0.0.0' --LabApp.allow_root=True
#start.sh jupyter lab --LabApp.token='password' --LabApp.ip='0.0.0.0' --LabApp.allow_root=True
volumeMounts:
- name: jupyterlab-data
mountPath: /home/jovyan/work
#mountPath: /data
- name: jupyterlab-config
mountPath: /home/jovyan/.jupyter
securityContext:
runAsUser: 0
resources:
requests:
memory: 500Mi
cpu: 250m
restartPolicy: Always
volumes:
- name: jupyterlab-data
#persistentVolumeClaim:
#claimName: fileshare-pvc
hostPath:
path: /home/sysic/Data
- name: jupyterlab-config
hostPath:
path: /home/sysic/config
################### 홈 디렉토리 변경하기 #########################################
(base) root@jupyterlab-deployment-6886db8858-rf68k:~/.jupyter# pwd
/home/jovyan/.jupyter
(base) root@jupyterlab-deployment-6886db8858-rf68k:~/.jupyter# more jupyter_notebook_config.py |grep jaeyon
c.ServerApp.root_dir = '/home/jaeyong'
(base) root@jupyterlab-deployment-6886db8858-rf68k:~/.jupyter#
apiVersion: apps/v1
kind: Deployment
metadata:
  name: jupyterlab-deployment
  namespace: default
spec:
  replicas: 1
  selector:
    matchLabels:
      app: jupyterlab
  template:
    metadata:
      labels:
        app: jupyterlab
    spec:
      securityContext:
        runAsUser: 0
        fsGroup: 0
      containers:
        - name: jupyterlab
          image: jupyter/datascience-notebook:latest
          imagePullPolicy: IfNotPresent
          ports:
          - containerPort: 8888
          command:
            - /bin/bash
            - -c
            - |
              chmod -R 777 /home/jaeyong
              #chmod -R 777 /home/jovyan/work
              start.sh jupyter lab --LabApp.token='' --LabApp.password='' --LabApp.ip='0.0.0.0' --LabApp.allow_root=True
              #start.sh jupyter lab --LabApp.token='password' --LabApp.ip='0.0.0.0' --LabApp.allow_root=True
          volumeMounts:
            - name: jupyterlab-data
              mountPath: /home/jaeyong
              #mountPath: /home/jovyan/work
              #mountPath: /data
            - name: jupyterlab-config
              mountPath: /home/jovyan/.jupyter
          securityContext:
              runAsUser: 0
          resources:
            requests:
              memory: 500Mi
              cpu: 250m
      restartPolicy: Always
      volumes:
      - name: jupyterlab-data
        #persistentVolumeClaim:
        #claimName: fileshare-pvc
        hostPath:
           path: /home/sysic/Data
      - name: jupyterlab-config
        hostPath:
           path: /home/sysic/config


| GRAFANA Time Range(V9.3.6 UP) (0) | 2023.02.24 |
|---|---|
| 인증서 기간 연장하기 (0) | 2021.11.25 |
| 인증서 갱신 - 전통적인 방법 (0) | 2021.11.24 |
| kubelet.conf certification 기간 확인 (0) | 2021.11.24 |
| 계속 꺼지는 etcd 컨테이너 etcd 용량 줄이기 (0) | 2021.11.21 |


| 2024-12 그래도 가끔은 웃긴 인생 (1) | 2024.12.12 |
|---|---|
| 2024-05 삶이 지칠 때 (1) | 2024.05.07 |
| 배우는 사람 (0) | 2023.05.10 |
| 힘들때 읽자! 듣자! (0) | 2023.04.03 |
| 금주 (0) | 2021.07.17 |


*
application/octet-stream
| iPhone 강제로 재시동하기 (0) | 2023.11.03 |
|---|---|
| ntp offset 추출 - ansible (0) | 2023.07.23 |
| 미드저니 기본 명령어 (0) | 2023.05.13 |
| windows os hostname s/n ip (0) | 2023.03.20 |
| grafana plugin 수동설치 (0) | 2023.03.03 |